Creating a Quote Information Sheet Form with Calculated Fields in Word 2007
OK, so a week turned into two months, but better late than never – here is my post on creating a Quotation File Information Sheet. What – doesn’t sound very glamorous to you? How could having key proposal information neetly organized and readily available not interest you? Ok, how about not having to re-invent the wheel each time you put together a proposal? Still not excited? What about having a way to systematically evaluate which deals you tend to win and tend to be most profitable? If that’s not enough then I give up – skip to the next post, but if you are intrigued, please read on…
The Guts – What to Include
So that you are not just putting together another beurocratic document guaranteed to make your colleagues groan, you need to give some thought to which data really needs to be included on this form. Ask your self the following questions:
- Is this information that I’m constantly looking for?
- Is this information that I might like to compare between proposals?
- Is this information that will help remind me what this proposal included?
- Am I forgetting something that I constantly have to cross reference somewhere else?
Here are some examples of data that you might want to include on a Quote Information Sheet and why you would want to include them:
- Quote # (unique sequential number assigned to all inquiries) – good for referencing the quote when communicating with other departments in your company as well as organizing supporting documents (all should have Quote # referenced)
- Prospective Customer Reference # (unique number assigned by your prospective customer to the inquiry) – good for referencing the quote in communications with your prospective customer, it is always a great idea to include this number in the subject of all emails to the prospective customer regarding the quote.
- Date of Inquiry (date prospective client asked you for a proposal/quote) – good point of reference and helps you calculated sales cycle or time to close the sale
- Prospective Customer Name & Primary Contact name (company name for prospective customer and full name of main contact at customer company) – this one is pretty self explanatory, but a purpose you might not think of immediately is being able to sort all inquiries by customer in a database or document search
- Due Date (date the prospective customer is requesting you have the quote back to them by) – good field to have available for sorting so that you can prioritize quoting tasks
- Projected Close Date (date the quoted project will likely be awarded by) – helps with forecasting revenue by close month
- Projected Revenue (the price quoted to the prospective customer in your quote or order of magnitude estimate price if in early stage of quoting process) – helps with revenue forecasting
- Change Request Table (table documenting additions/deletions/revisions requested by the prospective customer to the quotation or the project once it is awarded) – helps ensure changes to quoted price and delivery schedule are documented and communicated to the customer for approval
A quick note about the Change Request Table: I’ve seen clients lose a lot of money due to poor or non-existant change management processes. Be sure to take into consideration all the costs of making a change once a project has already started. It is important to be accomodating when you can, but your good clients want you to make money on their jobs.
Obviously there is other data relevant to your product or service that you will want to include. For example, the attached Quote Information Sheet was created for a fabrication company that likes to track labor (man hours) as a separate component for each job to help generate plant production metrics used for planning and evaluation of efficiency. Think about your company goals and what data you will need to help determine your progress toward acheiving them (Key Performance Indicators). Pulling out data like man hours in an easy to find data field can also be very useful for comparison purposes when quoting future projects.
Using Form Fields
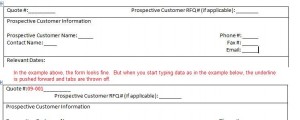
I’m often irritated when someone sends me a form in Word that looks great until I actually start typing in data e.g. there is an underlined space to fill in data, but when I start typing the underline trails the text (see Figure 1 below) – looks very messy.
When creating a form in Word, you should always use form fields for several reasons but especially the following three:
-
When the user types in data, your form will hold its formatting and look much neeter
-
The user can quickly and easily tab through the form from one field to the next without having to remove their hands from the keyboard
-
Data that is captured in form fields can easily be used to populate data bases or other documents using simple scripts and programming
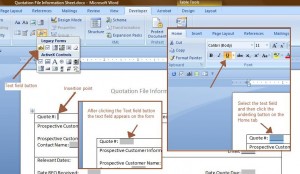
In Word 2003 inserting form fields was relatively easy – there is a nice little form tool bar that allows the user to insert text, drop down and check box fields into your document. In Word 2007, you have a to dig a little, but you can make the old form fields available on the Developer ribbon (see How to Make Form Fiels Available on Microsoft Word 2007 Ribbon). Once those fields are available all you have to do is position your cursor where you would like to have the user type data and then click on the text icon on the form fields ribbon (see Figure 2 thumbnail below with Word 2007 example).
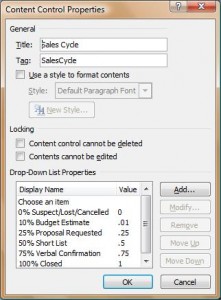
In the Figure 2 above I use form fields off of the Legacy Forms sub menu, but if you are going to be generating a lot of forms using Word 2007, you might want to take the time to learn more about the new Word 2007 form fields on Microsoft’s Office Online site. Though for basic forms, I think you’ll find the legacy form fields are more than adequate and easier to use. A simple text field is inserted in the figure above and this is the form field you’ll use most often for free form data in put. I’ve also used check box fields for yes/no data input and drop-down fields for multiple choice type questions where you want to standardize answers. In the attached example, “sales cycle” data is input into a drop-down field which my client uses to group data in a forecasting report and which is also used to calculate a formula field (see next section below). If the sales cycle data is not input in the correct format (very likely if a free form text field is used instead of a drop-down field), the formula field calculation would produce an error.
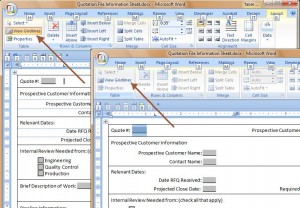
Notice in Figure 2 above that I’ve underlined the form field – unlike in Figure 1, this underline will appear under the text a user inputs when they tab to the field as opposed to out in front of it. I also highly recommend using tables for forms and putting each text field in its own cell so that the overall format of the document is maintained and text is not pushed out by preset tabs when long strings are entered in to preceeding text fields. Remember, you can erase the border lines between cells, so data can go into different cells without having them appear in different blocks when printed. For design purposes, gridlines for each cell can be hidden or made visible (see Figure 3 thumbnail below).
Calculated Form Fields
One additional benefit of using form fields is that you can use formulas to perform calculations based on data input into other fields. In the attached example, “Current Pipeline Value” is calculated by multiplying the % value listed as part of the drop-down field text for “Sales Cycle” by the dollar value listed in the “Projected Revenue” field which has been formatted as currency. Step by step instructions for created this field are below:
-
Name all fields that will be used in calculation:
-
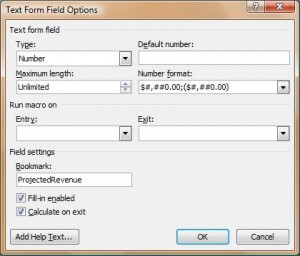
Click the “Properties” button on the Controls portion of the Developer ribbon – the Text Form Fields Options window will open
-
Type a name with no spaces in the “Bookmark” field (see Figure 4 thumbnail)
-
Click the OK button.
-
Note if you are using a drop-down field as in the attached example, you’ll want to enter the field name in the “Tag” field instead of “Bookmark” field. (see Figure 5 thumbnail)
-
-
Insert a text field from the Legacy Form sub menu where you want to display your calculated value
-
Right click on the text field in your document and select Properties from the pop up menu (or click the “Properties” button on the Controls ribbon) – the Text Form Field Options window will open
-
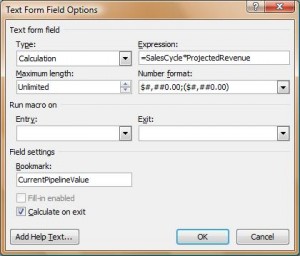
Select “Calculation” in the Type field (see Figure 6 thumbnail)
-
Enter your equation in the Expression field (see Figure 6 thumbnail) – this case the equation is “=SalesCycle*ProjectedRevenue”
-
I’ve added custom formatting to assure the value is shown in $ using the Number format field (see Figure 6 thumbnail)
-
Give your text field a name in the Bookmark field
-
Click the OK button on the Text Form Field Options window
Calculated fields could also be used to add sub estimates like a material estimate and a labor estimate or they can be used to combine text as well such as auto-assigning a name to your quote if you have a naming convention that your company uses for consistancy. For example, if your quote file naming convention is [Quote #] [Prospective Customer Name] then your Expression for the calculated Quote File Name field would be:
QuoteNum & ” ” & CustName
where QuoteNum and CustName are the Bookmarks you assigned respectively to the Quote # and Prospective Customer Name fields respectively.
Protecting Your Form
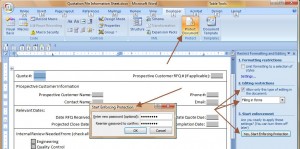
Users will not be able to input data into the form until it is “protected.” To protect a form see instructions and Figure 7 thumbnail below:
- Click the Protect Document button on the Protect portion of the Developer tab and the Restrict Formatting and Editing pane will appear on the right side of your Microsoft Word window
- Make sure that “Allow only this type of editing in the document” check box is checked and that “Filling in forms” is selected in the drop-down field below it
- Click the “Yes, Start Enforcing Protection” button on the Restrict Formatting and Editing pane and the “Start Enforcing Protection” window will open
- If you would like enter a password (highly recommended) twice and then click the OK button
To download the sample form used in this post click Quotation File Information Sheet – password for the form is: password
Finally, please leave comments with suggestions for fields, etc. that you use in your company forms.


A quick note – since Word Press would not properly upload a Microsoft Word 2007 file, I had to save the attached sample file in 2003 format which lost the calculated field information. Unfortunatley, Word 2003 does not have the same functionality in its drop-down field as Word 2007 so I wrote a little macro that performs the CurrentPipelineValue calculation. I have included that macro in the uploaded file so you will need to set your Microsoft Word security settings to Medium and then allow the macro to run when prompted for the forumal to be calculated properly.
My apologies for the inconvenience and if anyone can help me with how to upload a Microsoft Word 2007 file in Word Press I’ll be happy to post that version as well.