While working with a member of one of my client sales teams this week I was reminded of a little trick I learned years ago to help prevent no shows for sales meetings – use an Outlook Meeting Request as opposed to an email to schedule meetings with prospective clients. Read More
30th Aug 2008 | Comments (1) | Arrow Tips, Calendar, Front Page
Check out Two Outlook Add-ins You Can’t Ignore by my friend Mark Schmulen President of NutShell Mail – I tried the YouSendIt add-in after reading it and find it is pretty good for attachments under 100 MB. And look for a post from me during the next week regarding the future of Outlook versus internet based ASP solutions.
22nd Aug 2008 | Comments (2) | Add-ins, Front Page
One of my clients has engaged me to manage his sales and marketing team and they have been really great to work with. Obviously we use HuntressPro and some customizations to help them manage their call back list, opportunities and capture sales history. However, I was reminded last week of another basic Outlook tool that can really make a huge difference in aligning team goals (especially for younger less experienced team members) – the Tasks folder. Read More
16th Aug 2008 | Comments (0) | Arrow Tips, Front Page, Tasks
Some of you have may have read Arrow-Tip # 13 Can Outlook Help Me Track Billable Hours which discusses using the Microsoft Outlook Calendar to track billable hours. Thanks to Jim Long of Verge New Media for inspiring me through a twitter post to write about how I also use the Outlook Calendar to track mileage.
Read More
15th Aug 2008 | Comments (6) | Arrow Tips, Calendar, Front Page
Often you will want to create a custom view in various Outlook folders to see items filtered, grouped or sorted for a specific purpose. To create a table view in any Outlook folder, first select the appropriate folder in your Outlook navigation pane and then go to View/Arrange By/Current View/Define Views and the Custom View Organizer window will open (see thumbnail below).
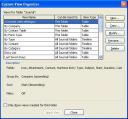
Click on the New buttn and the Create a New View window will open (see thumbnail below).
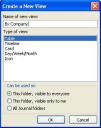
Type in the name of your new table and then make sure to select “Table” in the Type of View list box. Select whether you would like this view to be visible to other people who have access to this folder or if you would like this view to be available for other folders for the same item type (i.e. for an email view you may have other email folders where you will want to use the same view).
You are now ready to begin customizing your view with whatever fields, groupings and filters you would like to use for your view.
10th Aug 2008 | Comments (0) | How-To's
To access fields that you would like to add to an Outlook view you must first open the Field Chooser window. The field chooser window can be opened either by right clicking on the column header row in a table view and selecting “Field Chooser” from the pop up window (see below)

or by clicking on the Field Chooser icon on the Outlook Advanced tool bar (see below).

There are two types of custom fields in Outlook – custom folder fields and custom item fields. Custom folder fields can be found in the User Defined Fields in Folder category of your Field Chooser (see below)

Custom form fields can be found either in the Field Chooser category for the form if the form is published to the folder being viewed or using the Forms category in the Field Chooser if the form is published in the user’s Personal Folders (see below)


To add a custom field to the current Outlook table view, select the field in the Field Chooser list and then drag it to the column header row and drop it in between the columns where you would like it to appear (See below).

Alternatively, you can customize the view by right clicking on the column header row and selecting Customize Current View from the pop up window. Once the Customize View window opens (see below), click the Fields button to open the Show Fields window (see below).

In the “Select available fields from” drop down box, select the name of your custom form and then you should see the custom fields associated with your form in the list box below (see above). If your custom form is published at the Personal Folders level, you may not see its name in the drop down box list so select the last option which is Forms… and the Select Enterprise forms for this folder window will open. Select your form from the list box on the left and then click the Add button to move it to the list box on the right. Then click the close button and you should now see your form listed in the “Select available fields from” drop down field.
You can now select fields in the Available fields list box on the left side of the Show Fields window and then click the Add button to move them into the “Show these fields in this order” list box on the right. Use the Move Up and Move Down buttons to change the order of fields you select. When you are finished, click the OK button twice and you should now see the fields you added in your view.
23rd Jul 2008 | Comments (4) | How-To's

Most of you know from my previous posts that I recently lost my dear father after a 7 month battle with cancer. Dad’s illness and death definitely had an impact on my work which you may have noticed from time to time if you have been following this blog for a while, but it has been my great privilege to help support my parents through this difficult time and I wouldn’t have had it any other way. However, one thing I learned from my father was his work ethic and lately I have been hearing his voice inside my head telling me to get back on track. I’ve placed the Marine Bull Dog that my sons gave Daddy on top of my computer armoire to stare down at me and make sure I stay on track just as Daddy did (see picture). Soooo, I’m going to take this opportunity to show you how I’ve used Outlook to help me jump back in and of course this post is dedicated to my daddy who is likely up there shouting at me “its about time!”
Read More
21st Jun 2008 | Comments (1) | Arrow Tips, Contacts, Front Page
If you use custom forms for your contact records (such as Huntress Contact forms) you may from time to time need to convert new contacts added using your smart phone or a v-card to your custom form. Huntress provides a mechanism on the Huntress menu for converting forms to the Huntress Contact form, however, it is helpful to convert several contact records at the same time rather than having to convert them one at a time. To see all of your custom and standard contact records grouped together, you can create a By Form Type view which will make it much easier to convert forms in mass.
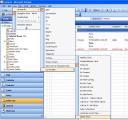
Select your Contacts folder in Microsoft Outlook (select the Contacts options on the Outlook Go menu). On the View menu select Arrange By>Current View>Define Views (see thumbnail below)
The Current View Organizer window will open (see thumbnail below).
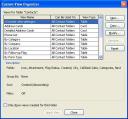
Under the View Name column, select By Category and then click the Copy button on the right hand side of the Custom View Organizer window. The Copy View window will open (see thumbnail below). Type “By Form Type” or whatever name you want to give the new view in the “Name of new view” text box. If you would like to use this view in multiple Contacts folders then be sure to select the “All Contacts folders” radio button. On the other hand, if you would like for other user’s with access to your Contacts folder to be able to see this view then select the “This folder, visible to everyone” radio button. Click the OK button on the Copy View window.

The Customize View: By Form Type window will now open (see thumbnail below) – click the Group By button.

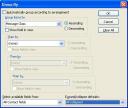
The Group By window will now open. In the “Select available fields from” drop down box in the lower left hand corner of the Group By window, select “All Contact Fields” – you will likely have to scroll to find this option or just keep clicking the “A” key until it comes up. Now in the first “Group items by” drop down window in the upper left hand portion of the Group By window, select “Message Class”. Finally, in the “Expand/collapse defaults:” drop down box in the lower right hand corner of the Group By window select “All collapsed”. (see thumbnail below)
Now click the OK button on the Group By window, the Customize Current View window and the Apply button on the Custom View Organizer window. Your new view should be visible in the contacts folder (see thumbnail below).

5th Jun 2008 | Comments (0) | Contacts, How-To's
Tonight we lost my dear sweet Daddy Charles Hibbler. Thanks again to all of you who sent your prayers and good thoughts our way. I am more determined than ever to accomplish my goals because I know that is what my father would have wanted. In the mean time, the picture of my father below was taken by my brother about 3 weeks ago.

30th May 2008 | Comments (4) | Front Page
Just a quick post to let Arrow-Tips readers know that I have not abandoned you or my May goals. My dear father is very ill and I am taking some time off to be with him and my mother. I do plan to blog about my experiences and how I’m still using Outlook to help me get back on track when the time comes so please stay tuned. And thanks so much to all of you who have sent your prayers and good wishes for my father and our family – they mean so much!
27th May 2008 | Comments (1) | Front Page
« Previous Page — « Older Posts


