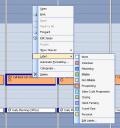
From and Calendar view, right click on the appointment, select Label from the pop-up menu (see thumbnail below) and then select the color and label you would like to use.
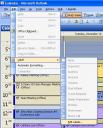
From the appointment form, select a label from the Label drop down field in the upper right hand corner of the form (see thumbnail below).
3rd Jan 2008 | Comments (0) | Calendar, How-To's
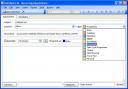
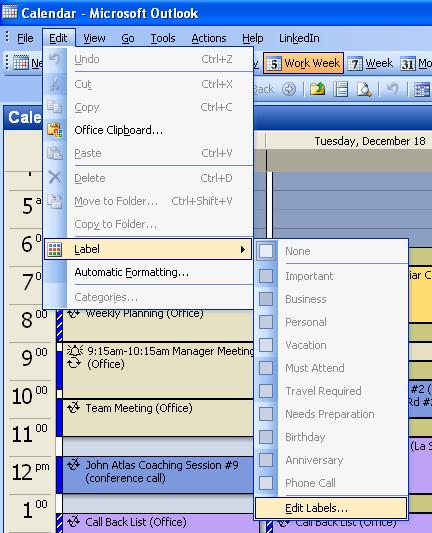
First switch to the Calendar folder and then on the Outlook Edit menu, select Label and the Edit labels from the sub menus (see thumbnail below).
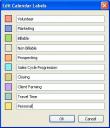
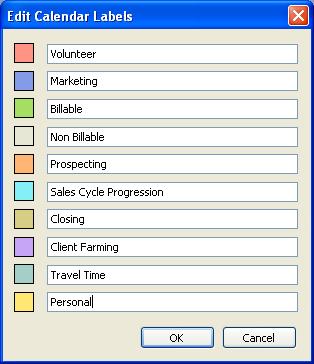
The Edit Calendar Labels window will open (see thumbnail below). Type in what ever text you want to use for each label and then click the OK button.
3rd Jan 2008 | Comments (0) | Calendar, How-To's
Adam Halpern of Soft Sell Training just sent me a great link to an NPR sound bite regarding how to better manage information overload from your inbox. The NPR link discusses some of my favorite tips and pet peeves so definitely check it out when you get a chance!
28th Dec 2007 | Comments (0) | Front Page, Inbox
My friend attorney Dan Krohn commented to me last week that I’m everywhere on the internet meaning I’ve got a lot of profiles on a lot of sites. So when I got an invitation from social media expert Erica O’Grady to connect on a new site called “Spock” I couldn’t resist adding just one more. I am after all a trekky so a site called Spock has to be cool – right? Read More
23rd Dec 2007 | Comments (3) | Front Page, Social Media
Have you ever mistaken efficiency for laziness e.g. your spouse doesn’t close the cabinet while cooking in the kitchen – you think this is laziness, but your spouse knows that in about 15 seconds he/she is going to need to get something else out of the cabinet so it is more efficient to just leave it open for now. OK we can save the debate for that one, but let’s talk about how it translates to the Microsoft Outlook Calendar – who hates time cards? If you answered “not me” you’re either a fibber or a bit bizarre, but for the rest of you please read on. Read More
23rd Dec 2007 | Comments (1) | Arrow Tips, Calendar, Front Page
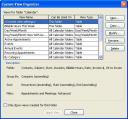
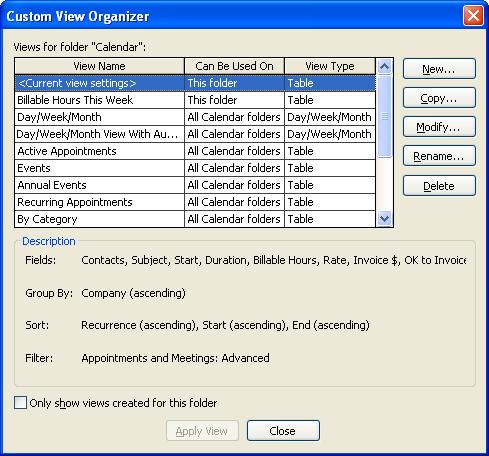
From the Microsoft Outlook Calendar view menu bar select View/Arrange By/Current View/Define Views and the Custom View Organizer window will open.
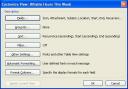
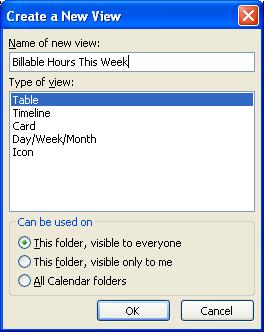
Click the New button and the Create a New View window will open. type “Billable Hours This Week” in the Name of new view field and then make sure that Table is selected for Type of view. If you use Outlook on a mail server and would like to allow other users on your server to see this view, make sure that This folder, visible to everyone is selected in the Can be used on frame at the bottom of the Create a New View window (see thumbnail below).

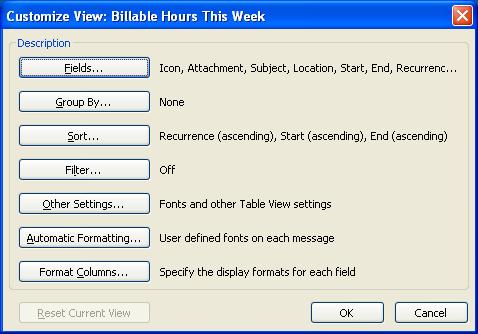
Click the OK button and the Customize Current View: Billable Hours This Week window will open – see thumbnail below.
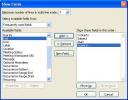
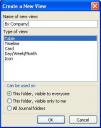
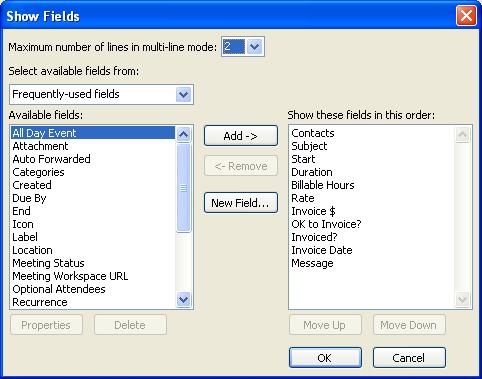
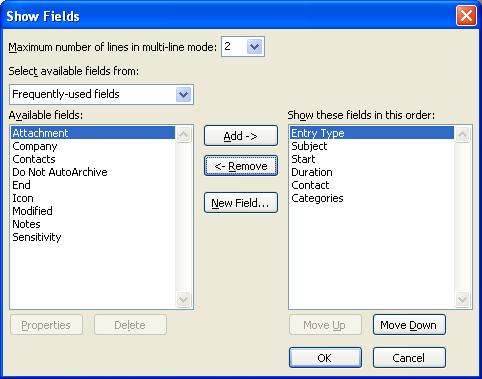
Click the Fields button and the Show Fields window will open. “Frequently Used Fields” will most likely be visible in the “Select available fields from” drop down box. To add a field to the view, make sure it appears in the “Show these fields in this order” list box on the right hand side of the window, select it and then click the Add button. Add the following fields from the Available Fields list box on the left hand side of the window if they are not already listed in the “Show these fields in this order” list box: Contacts, Subject, Start, and Duration – see thumbnail below:
For fields appearing in the “Show these fields in this order” list box that you do not want included in the view, select them and then click the Remove button. Click the New Field button to add the first custom field “Billable Hours” and the New Field window will open. In the Name field type “Billable Hours”, select Number in the Type dropdown field (see thumbnail below) and then click the OK button.

Repeat this process for the following fields using the data types in parentheses and the Formats after the dash for each listed field:
- Rate (Currency) – $12,345.60 ($12,345.60)
- Invoice $ (Formula) – [Billable Hours]*[Rate]
- OK to Invoice (Yes/No) – Icon
- Invoiced? (Yes/No) – Icon
- Invoice Date (Date/Time) – 12/23/2007
Next select “Message” from the Available Fields list box and click the Add button. The Show Fields window should now look like the one below.

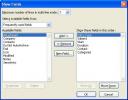
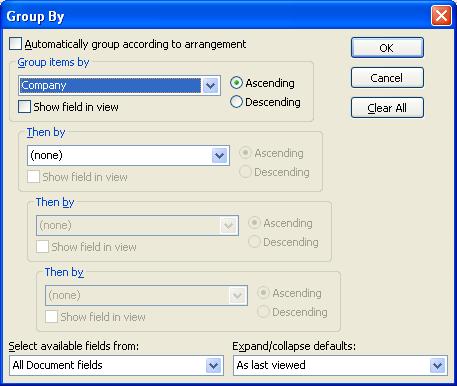
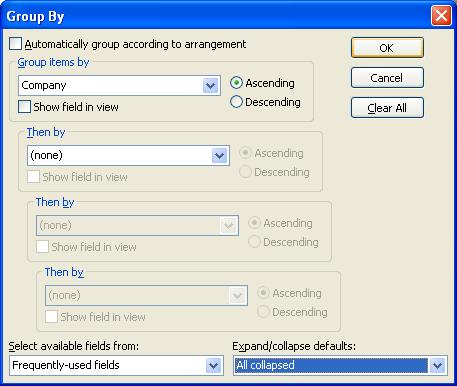
Click the OK button and then click the Group By button to open the Group By window. Select “All Document Fields” from the “Select available fields from” dropdown box in the lower left hand corner of the Group By window. Next select Company from the Group items by dropdown box in the top left hand frame of the Group By window – see thumbnail below. Click the OK button.

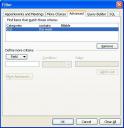
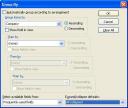
Now click the Filter button to open the Filter window. Go to the Advanced tab of the Filter window, click the Field button and then select “Categories” from the Frequently-used fields popup menu. Set the Condition dropdown field to “Contains” and type the word “Billable” in the value field then click the Add to List button. Next click the Field button and select “End” from the Frequently-used fields popup menu. Set the Condition dropdown field to “this week” and click the Add to List button. The Filter window should now look like the one in the thumbnail below. Click the OK button.
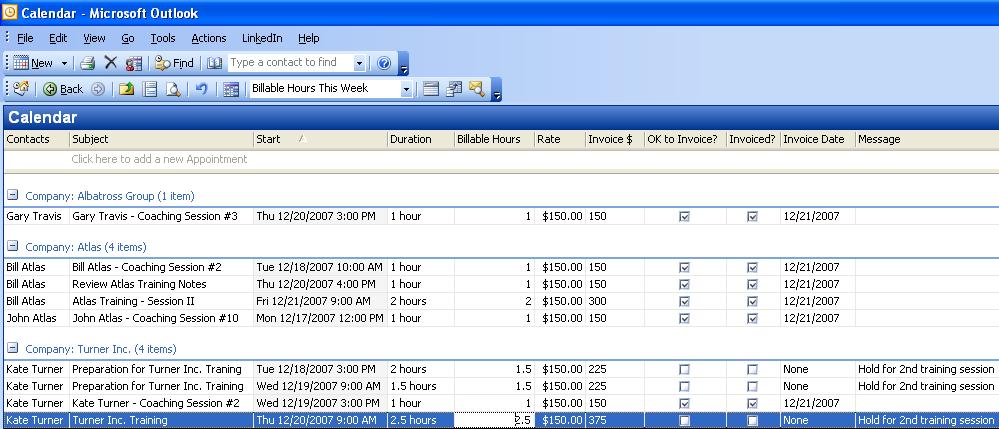
Click the OK button on the Custom View: Billable Hours This Week window and your view should now appear similar to the one below.
Please note that you will need to list “Billable” in the Categories field for all billable appointments so you may want to add that category to your Master Category list. To add a category to an Outlook appointment, either use the Categories button in the open appointment item or right click on the appointment from any calendar view and select Categories from the pop up menu. Check off “Billable” in the Categories list box of the Categories window and then click the OK button.
23rd Dec 2007 | Comments (7) | Calendar, How-To's
Check out my profile at Technorati. If you are a blogger, you might want to consider setting up your own profile there as well and if you do, please remember to favorite me!
<a href=”http://technorati.com/claim/gbmkwhf2xa” rel=”me”>Technorati Profile</a>
29th Nov 2007 | Comments (0) | Front Page, Social Media
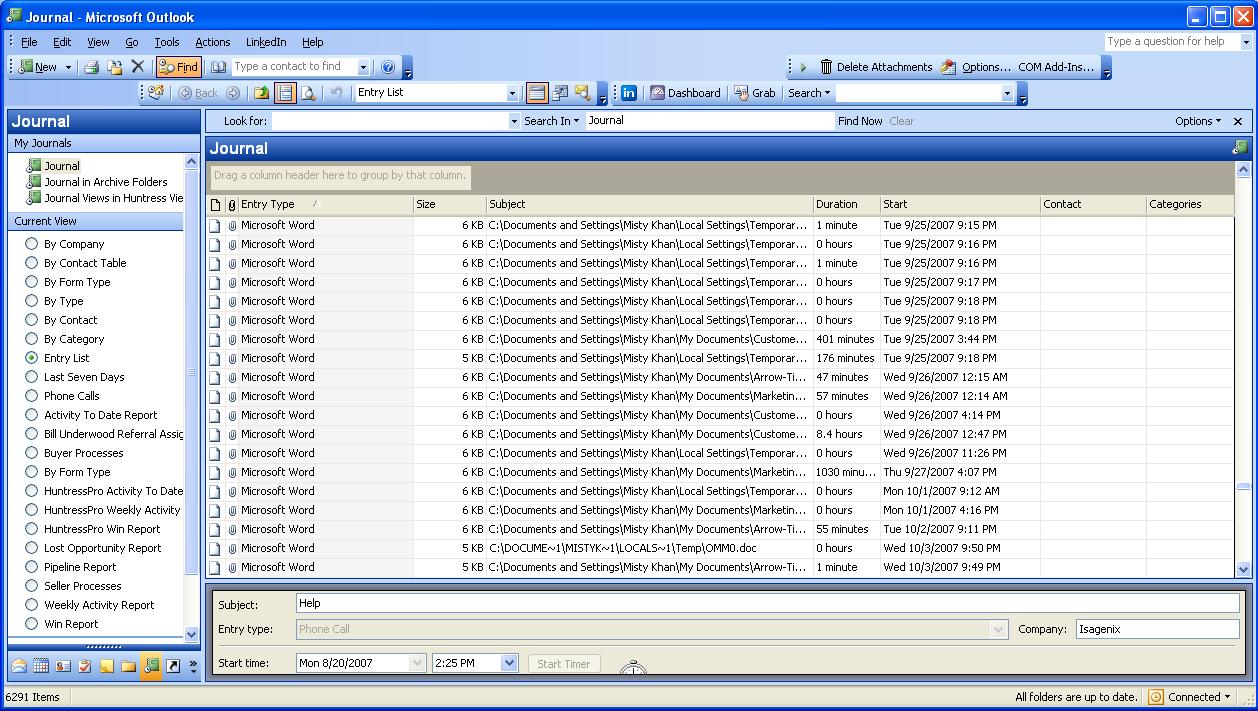
Have you ever used your Microsoft Outlook Journal folder? Did you know there is an Outlook Journal folder? Since the Journal folder is not exactly prominent in Outlook 2003 or 2007, it would not be surprising if you didn’t. But the Journal folder has some great features – especially if you are continually asking yourself where your day went? Read More
12th Nov 2007 | Comments (1) | Arrow Tips, Front Page, Journal
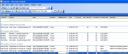
Select your Outlook Journal folder and then go to View>Arrange By>Current View>Define Views – the Custom View Organizer window will now open (see thumbnail below).

Click on the New button on the Custom View Organizer window and the Create a New View window will open. Type the words “By Company” in the Name of new view field and then make sure that Table is selected in the Type of view list box (see screen print below) then click on the OK button.
The Customize View window will now open. Click the Fields button and the Show fields window will open. You can select whatever fields you like to appear in this view by selecting them in the Available fields list box and then clicking the Add button. Likewise you can remove fields that you do not think you will use by selecting them in the Show these fields in this order list box and clicking the Remove button. Make sure that at least the fields shown in the Show these fields in this order list box in the thumbnail below are included and then click the OK button.
Now click the Group By button on the Customize View window and the Group by window will open (see thumbnail below). In the Group items by field, select Company from the dropdown list. You may also want to select All collapsed from the Expand/collapse defaults dropdown list at the bottom right hand corner of the Group by window so that you can easily scroll through companies to find the one for which you want to observe journal entries. Then click the OK button.
Now click the OK button on the Customize View window and then the Apply View button on the Custom View Organizer window. You should now see the By Company view in your Outlook Explorer window.
12th Nov 2007 | Comments (0) | How-To's, Journal
Place your curer in the notes/body field of the Outlook item (in the thumbnail example below, we are using an Outlook journal entry). Unless the item is an email, on the item menu bar select Insert/File and the Insert File window will open. Read More
9th Nov 2007 | Comments (6) | How-To's
« Previous Page — « Older Posts

